
Home
Restricted Access
Command Structure
Resources
Kill Shots
Screen Shots
Medals Index
Propoganda
Message Board
Secure
Msg Board
Historical Facts
Glossery
Enlistment
Links

![]()
![]()
Vote For Us
Resource Tactics
Stuka Bombing
Provided by OKW

Learn everything about the art of divebombing with "Coopers" excellent
stukaguide.
Introduction
First I have to say, that I m german. And I hope you will excuse me, if I make many
mistakes by writing the translation of my guidebook for the Ju 87 (damn, first two
sentences and I guess its wrong lol).
During my previous sessions in WW2Online, I recognized, that the most pilots are using the Messerschmidt Bf 109 for Close Air Support - meaning, that they relief friendly and atack enemy groundtroops. But the Bf 109 has only a very low chance to damage an enemy tank. Thats because of its low armament of machineguns and 20 mm guns. Even the maingun of a Panzerkampfwagen III (37 mm) penetrates the armor of an a13 (up to 30 mm) or even of a Char (up to 60 mm) only with difficulties. Understandably, that a kill of an enemy tank with this fighter only happens with great luck.
But then, why is the Bf 109 anyway used against this "metalltins"? Of course because it is just funny to go in with a high speed and fire a salvo of shoots on a target. But otherwhise (I think so) because many pilots dont know, how easy it is, to kill a tank with the Ju 87 Stuka, and because of many Axis gamers dont know the right way to maneuver it correctly for atacking.
Most pilots trying the first time to handle the Junkers dont get victories at once. To destroy the enemy tank, it has to be hitten with the 550 kilo bomb nearly directly. Using a "normal" approach for bombing, which the most newbies sure take first, flightspeed, diveangel, wind, (maybe) the speed of the target and the weight-caused ballistics of the bomb has to be calculated.
To show our air force (Luftwaffe) the correct tactics, only relying on my own discoverys, i wrote this guidebook. I am convinced, that well-trained Stukaunits can affect the course of groundbattles. And we ve got time to practice still. The war hasnt begun and the Alliies dont have bombers yet. So, we can get a lead of the skills by bombing enemy targets.
To study this guidebook and train the specific tactics, you should be able, to start and land the aircraft, know how to use the keymapper and achieved basic experiences with the game, because I wouldnt deal with these things.
I will never tell you, that the tactics, shown by me here are perfect. On the contrary. I dont have very much experiences with WW2 - aircraftsimulations. Well Air Warrior - pilots may notice, that i dont know specific data, notions and knowledges. I relate only to knowledges, which you can get from the game WW2Online. With this tactics i achieved my successes (hitrate of 70 %) and until the above noted date i dont have any improvements to these maneuvers and tactics. If anybody has reached higher hitrates or want to add something to this little manual, I am interested to monopolize these additions to this handbook.
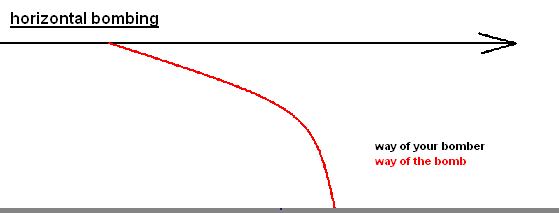
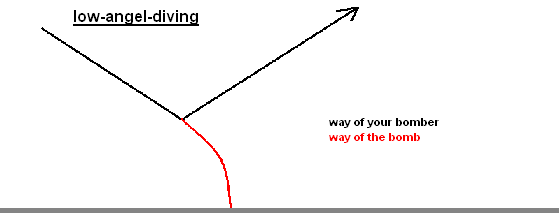
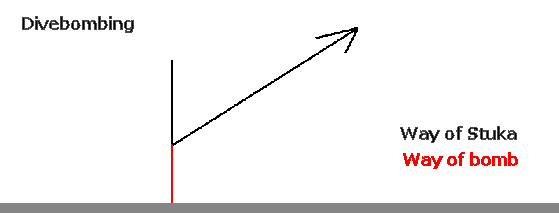
1. the aim of approaching
As I said in the introduction, there are many factors to be calculated, if u use a
"normal" (horizontal or diving in a low angel) bombing raid. But the Stuka isnt
a "normal" bomber. Stuka stands for Sturzkampfbomber, what means divebomber
(Sturz = [to] dive). To eliminate some of the mentioned factors, you got to dive with the
Ju 87. As more vertical as better. As more vertical the diveangel is, as higher your
aimingaccuracy will be. Thats because of, if u reach a optimal vertical 90° - dive the
factors flightspeed, bombweight, angel of inclination and altitude of dropping the bomb
wouldnt influence the ballistics. As you see by the following images, the chance to fail
hitting the target using horizontal bombing is maximized. Low-angel-diving improves the
accuracy a bit. But the the maximum of accuracy you only reach by using a 90°-angel,
shown on the last picture.
2. How to notice a 90° angel?
An optimal vertical dive is, as said the aim of aprochaing, to get the highest accuracy by
bombing enemy tanks. But, you can imagine, if the ground is getting closer to you with a
speed of about 300 km/h (about 500 mph) it is not very easy to guess if you are in the
correct angel. To make it easier for you, to guess your diveangel you can use your
compass. As you see by normal maneuvers, it shows you the flightsituation of your plane.
It isnt showing you the angel of your craft by a specific factor, but with the blue
compassband, it is much easier to guess the correct angel of diving. As more as you get
closer to a 90 degrees angel, the band will get more and more narrow, until its only a
very thin line. That is caused, because you are looking from above to the top of the bamd.
The following pictures should make that clear.

If the angel ist to small, you have to pull the flightstick forward. If it is to high, you have to pull it back. Of course you have only to do this, if the target is in this direction. As you can imagine, it wouldnt bring anything, if the bomb is droped in a 90° angel, but only causes headpain to the tankdriver.
3. How to get a 90° - dive to the target
As you know now, you have to dive in a vertical angel if possible. And you know how you
can recognize, that you are in such an angel, too. Now we are starting with the most
difficult part handling the Stuka: to get the target exact down under you, if you dive in
a 90° angel. Maybe you think this isnt difficult, but I m absolutly shure, that you have
to practice for this the most time. If time passes bye, you will reach the point, that you
just know, that you are in the right position to dive. But untill you have this feeling,
you better would follow the here shown maneuvers.
The approaching into the target zone is caused by the specific mission type. I myself devide into the following categories:
-navigationapproaching
-flashapprochaing
-circleapproaching
Navigationapproaching
The navigationapproaching is the easiest of all. To use it, we have to recognize a
specific target by the in-game-map. For example you atack an aircrafthangar, a bridge or a
factory (untill now this wouldnt have any effects to the war or isnt implementatet to the
game yet - but later these things will get very a very essential role). But also if you
know, that enemy tanks are in a specific city, you can use the navigationapproaching.
Untill you reach the divepoint (the position where you begin to dive) you try to get the maximum of flightlevel (altitude). As higher you are, as more time you have to localize specific groundtargets and correct your diving for these targets. If I say in the maximum of flight level, I mean a minimum altitude of 1.000 meters (as you can see here, the most pilots use the Stuka wrong, because I have never seen other Stukas in such flight levels).
Untill you dive, your map is activated. As soon, as the arrowhead is above the target, you deactivate the map, deactivate throttle (dont pull the engine off), roll the aircraft to the left or to the right untill 180 degrees, so that the ground is above your cockpit and activate the divebreake. In the next moment you pull the flightstick back, untill you reach allmost a 90° angel. Dont wonder, if you cant see targets from this flight level. Many times the clouds make that impossible or you didnt have reached the height, in which buildings or even tanks wont be able to spot. But the grey cityareas you should be able to find after you have broken trough the clouds. Next you can spot buildings, trees and, finally tanks.
You choose one of the enemy tanks and correct your dive a bit. Now you reach the finall part of approaching, which is shown later, because all approachings have the same finall part.
Flashapproaching
Flashapproaching is used, if the specific position of a target is unknown. For example in
CAS - missions (close air support) in opened groundbattles. You can use this
approachingtype if you dont have enough time to climb on a higher flight level.
After entering the targetzone you go a bit deeper, but do not dive. Dont use divebrake or lower your throttle, or you will lose a big part of your flight energie. Use the scope sight, to search for enemy tanks.
If you couldnt find any possible targets, you fly after exiting the target area a courve and check your tail for possible enemy fighters. When you are on course again to the target zone, you retry to find targets.
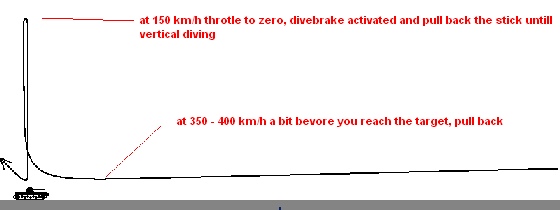
As you spot an enemy tank, you go again a bit deeper, to reach a higher speed. Fly direct to the tank (bewared of enemy groundfire - maybe its saver to approach the tank from behind or from his sides). About two seconds before you would colidate with the tank, you pull back your flightstick. At this point, you should have a speed of 350 to 400 km/h (to practice the correct position to pull back the stick, you can use the offline-mode - if you have the correct speed, you have to pull, if you reach the outside markingline of the practice-target).
If you are above the tank, you should be flying vertical into the sky. Once your speed has lowered to 150 km/h (thats the 2nd fat marking on your speedometer), you set your throttle to zero. After a second you pull back your stick again and activate your divebreake. You pull as long untill you see your target trough your frontwindow. At this moment, your flightspeed should be nearby zero. Thats no problem, if you constantly pull back the stick. Now you adjust your dive, untill the target is in your crossbar. Here begins the final part of diving, too, which is explained last.
Circleapproaching The circleapproaching is the most difficult of all approachingamneuvers. However, it can be used in many different situations. An altitude of about 1,000 meters is requiered for this maneuver (minimum). You can use it for example for the following situations: 1. you know, that an enemy tank is somwhere down under you, but you dont know the correct position. 2. you are lurking for an enemy tank to spawn in a AB or FB. 3. you spot an enemy tank next to you, but you have to take him out at once, so that a flashapproaching would take to much time. Of course you can use the circleapproaching for many other specific situations, but the examples show you enough what its good for.
Okay, you are somwhere abve an enemy tank, with a altitude of 1,000 meters or higher. You watch out of your cockpit to the left or right and spot the enemy. For this, maybe you have to roll your aircraft a bit.
As you have spotted your target exactly, you begin to circle above him. The circles you are flying, you draw closer and closer. Maybe its needed, to correct your altitude a bit. For this you bring the aircraft back into a horizontal situation and pull a bit back.
Once you reach the situation in your circles, that the target is direct under you, while you are rolled 90° and look outside of your sidewindow, you roll again 90°, so that the grund is above your cockpit. Now very quick: throtle to minimum, divebrake activated and pull back the stick, untill you dive to the target.
Before I explain the finall few seconds of atacking a target, I need to warn you about the circleapproaching. Its dangerous, because sometimes you wouldnt care about your height. That would cause, that you may crash the ground or you will get into the explosionarea of your own bomb. Practice this maneuver only, when you succeed navigation- and flashapproaching.
4. The final dive
Okay, you ve reached the finall stage. You get closer to the target and your finger is
stroking the drop-button. What now to care about? Well, first you bring your crossbar over
the target. A short view to your compass. Is the target in a 90° angel? If so, then you
did a good job while approaching. As the target gets closer, you drop the bomb. Minimum
height to drop is 350 meters over the ground (mentioned, that the heightometer [I really
hope, this is the right word *bg*] shows your altitude above sea-level).
A millisecond after droping the bomb, you pull the stick full back and deactivade the divebrake simultaneus. At this moment you shure will get a blackout. With a little bit training, you will know, when you can higher your throtle. If you do it too late, your aircraft will STAL. If you do it to earlie, you may crash the ground.
After you reached a savely height, you check your six, if an enemy fighter wants to dance with you. At the same time maybe its possible to watch the explosion of your bomb.
As long as the game is still in the fixing-phase and the real war hasnt begun, it would be usefull, to return to your target and look out for the crater of your bombexplosion. Set it in relation to the target, and you may realize any mistakes you ve done in the final divephase.
You dont have to wonder, if the enemy tank looks still allive. I only left one time a smoking wrack behind me. However, the tank is often destroyed or the crew is dead. Just wait (sometimes up to a minute) untill the player clicks "exit vehicle". But if you recognize, that the tank is driving courves (rolling is also possible after his death) and shoots on your own troops, you have to realize, that you didnt hit him.
All right, you ve seen, how goes up, if everything runs optimal. But in the war, and especcially in the air war the most things dont run, like the ideal cases of such crazy writers like me. So, whats to do, if you realize while diving, that the target is not in a 90° angel under your aircraft (compare 2. "How to notice a 90° angel?")?
Of course you have to adjust your angel of inclination. But it wouldnt help you in any case, if you bring your crossbar over the target and press the drop-button. This wouldnt help you, because the bomb isnt falling to the ground accordingly to your flightway (as seen by picture 2, part 1.). Caused by the weight of the bomb the way of its flight will be disorted downwards, because you are not longer in a 90° angel.
This disortion you have to calculate, if you drop the bomb. You aim not longer direct to the tank. As seen from you, you aim a bit behind him. The following pictures make that clear: in the left image, you have a 90° angel. But dropping the bomb in this situation wouldnt cause anything to the target (red cross). You have to calculate the disortion. The disortion depends on your speed, your altitude when droping the bomb and your diveangel.
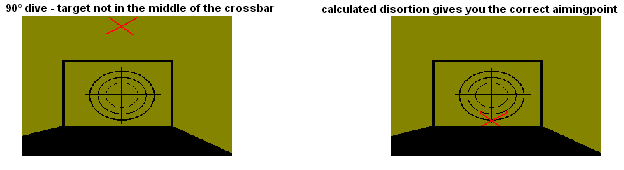
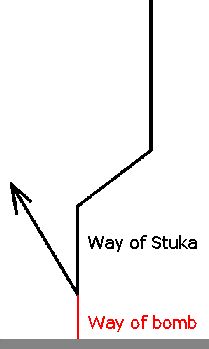
This sollution is not the optimum. By calculating the disortion of the Bomb, you may make any mistakes. But there is a much better way, to eliminate the problem. Instead of calculating the disortion, you bring your flightway with a short maneuver back into a 90° angel above the target.
This maneuver should only be taken, if you are in a bigger height. Because of this, ist normally used after a navigationapproaching (compare 3. "How to get a 90° - dive to the target?"). To correct your flightway, you bring your crossbar a bit over the target, just a bit more as you want to calculate the disorption of the bomb (as seen in the above picture 2.). As more as you are away from a 90° angel, if you dive directly to the target, as more you target above it. This will cause, that you will cross at one time the position, in which you can return to a 90° dive above the target. If you reach this point, you return to your exactlly vertical dive. The following picture makes that clear.
Using the rudder
You better youse the rudder not, if you want to aim on a target. As you use it, it lies
you a wrong flightway. To show this, go into a vertical dive and pull the rudder to
maximum. You may think, that the bomb will hit the ground, where your crossbar is. That
will not happen. Stop pulling the rudder at once, and you will see, where the bomb will
explode.
The rudder can only be used for diving and aiming, if you stop pulling it, before dropping the bomb.
Atacking moving targets Atacking moving targets is much more difficult, that bombing not moving. My own hitrate lowers by 30 to 40 %, bombing moving tanks. The problem is, that you have to calculate the distance, which the tank moves between your drop of the bomb and the explosion of it. The calculated distance gives you the point, onto which you drop the bomb.
