
Home
Restricted Access
Command Structure
Resources
Kill Shots
Screen Shots
Medals Index
Propoganda
Message Board
Secure
Msg Board
Historical Facts
Glossery
Enlistment
Links
![]()
![]()
Vote For Us
Resource Tactics
Tank Tactics
From the pages of the 1st FJ PanzerKorps Panzer Operations Manual
 Tank Tips and Tactics
(best viewed at 1024x768)
Please wait for page to load
One of the more important things you learn while operating a Panzer is how to NOT die. There are several reasons why some players head out only to be slaughtered like cattle, lets examine a few.....
Reason 1 - They're all
alone.
Though
it's sometimes a noble thing to dash off by yourself to save the day, you're better off
waiting for backup consisting of at LEAST one other Panzer. I've worked repeatedly
in two-tank teams with other players with great success. By having a 'wingman' you
can protect each other as you advance, and you'll have more options when attacking.
Reason 2 - Lack of
cover and concealment
Your
Panzer is your life, and you should take any means necessary to protect it and your life.
All too often I see tanks dashing off across an open field totally exposed, and
later I see the smoke trails marking their demise. Use the terrain to your best
advantage, even wide open plains have some form of concealment you could use.
Anything you can find which will prevent the enemy from either seeing you, or
hitting you, can and should be used!
Reason 3 - Lack of
Patience
Yeah
sure, we all want to start dropping AP on the first sign of movement we see, it's a
natural urge. But by waiting and maneuvering to the best position possible you can
almost always assure yourself of several kills per sortie. Firing from maximum
distance at a tiny target is not only very difficult, but it wastes ammo. Be patient
and wait for the target to get closer, this applies to defense as well as
attacking.
Tank Formations and Movement (sample fields of fire shown in red)
Though formations are not frequently used, they DO have their advantages if properly implemented. A well organized formation will maintain 360 degrees of visibility and fields of fire, can easily maneuver as a whole unit, and will pack a powerful punch during an assault.
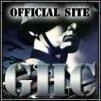
| Echelon Left : Tanks are formed in a diagonal line to the left rear of the leader. This formation is useful while advancing when you expect an attack from your left side or left front. All tank guns can be quickly brought to bear on the targets without crossing the path of fellow Panzers. This formation can also be quickly turned into a Line Abreast formation by turning everyone to the left. | 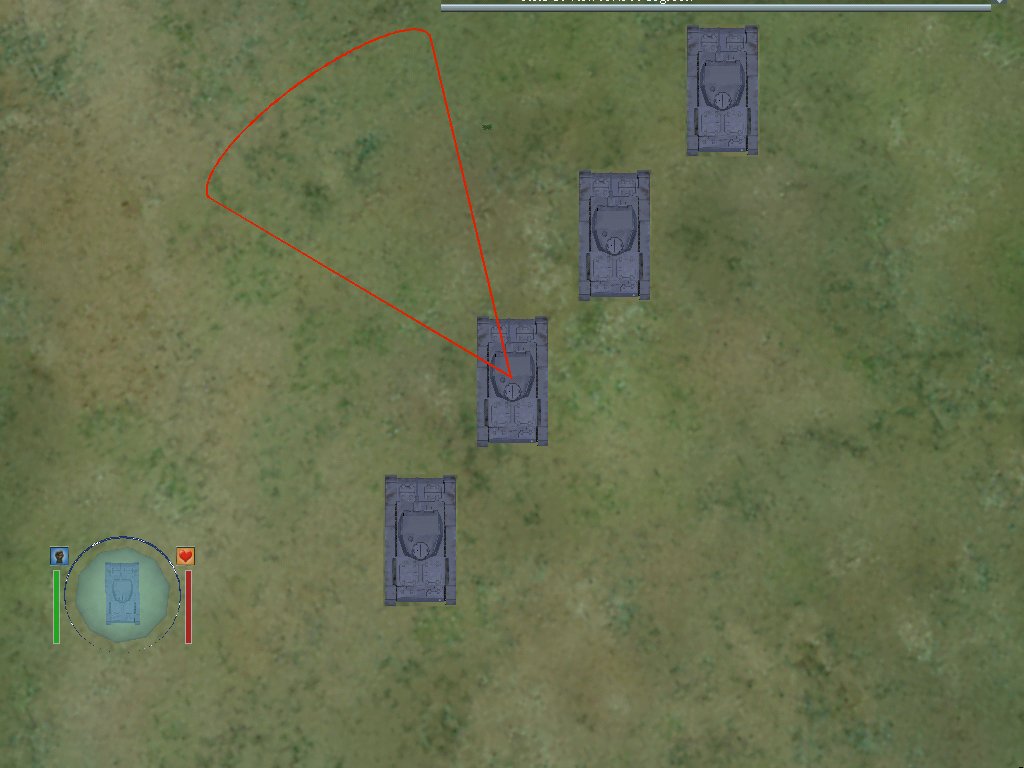 |
| Echelon Right: Tanks are formed in a diagonal line to the right rear of the leader. This formation is useful when you expect an attack from your right side or right front. It's flexibility is identical to Echelon Left. | 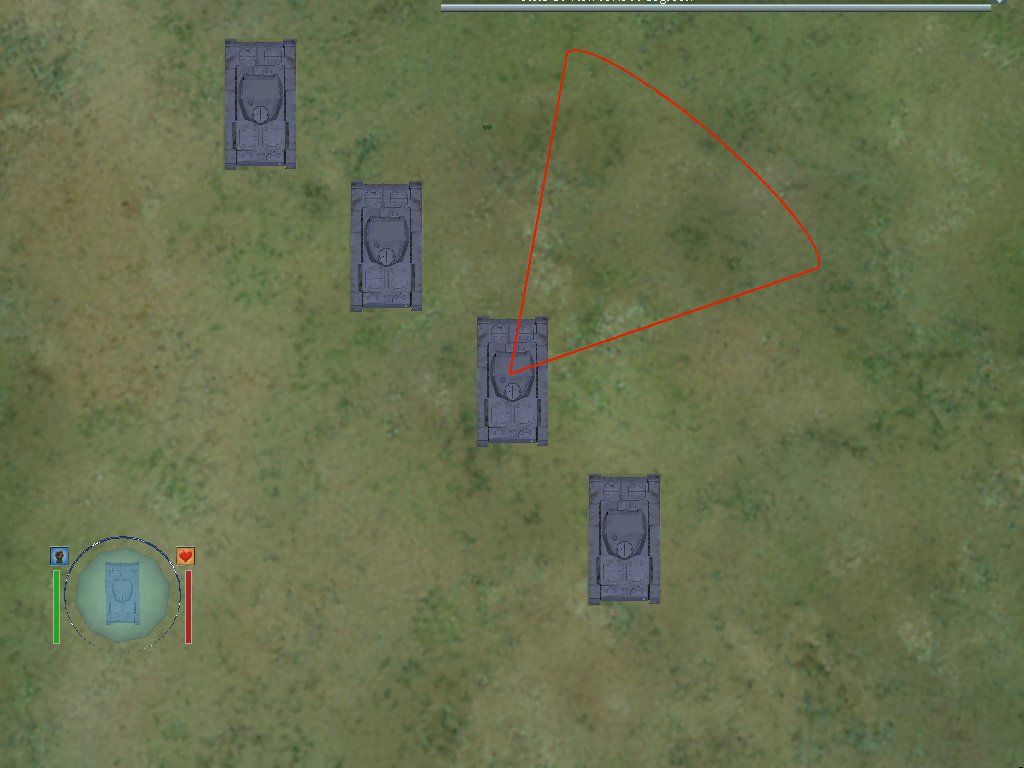 |
| Wedge: This is a handy formation to use when you don't know for sure where the enemy will be attacking from. No matter where the enemy comes from the Panzer group will be able to have at least 3 tanks immediately start engaging the enemy. The tanks which are out of the line of fire can then reposition if needed. This formation also packs a powerful punch when sweeping through towns. Each driver maintains a mental 'drive line' through the town. As he encounters obstacles he maneuvers around them, and then returns to his drive line. If used correctly, the entire town can be thoroughly cleared in one sweep, rather then several tanks scurrying around. |  |
| Line Abreast: This formation is great for attacking a single frontal target, or defending an attack from a known direction or choke point. Massive firepower and decent fields of fire are its key points. Movement is difficult though and speeds should be kept moderate to maintain the formation. | 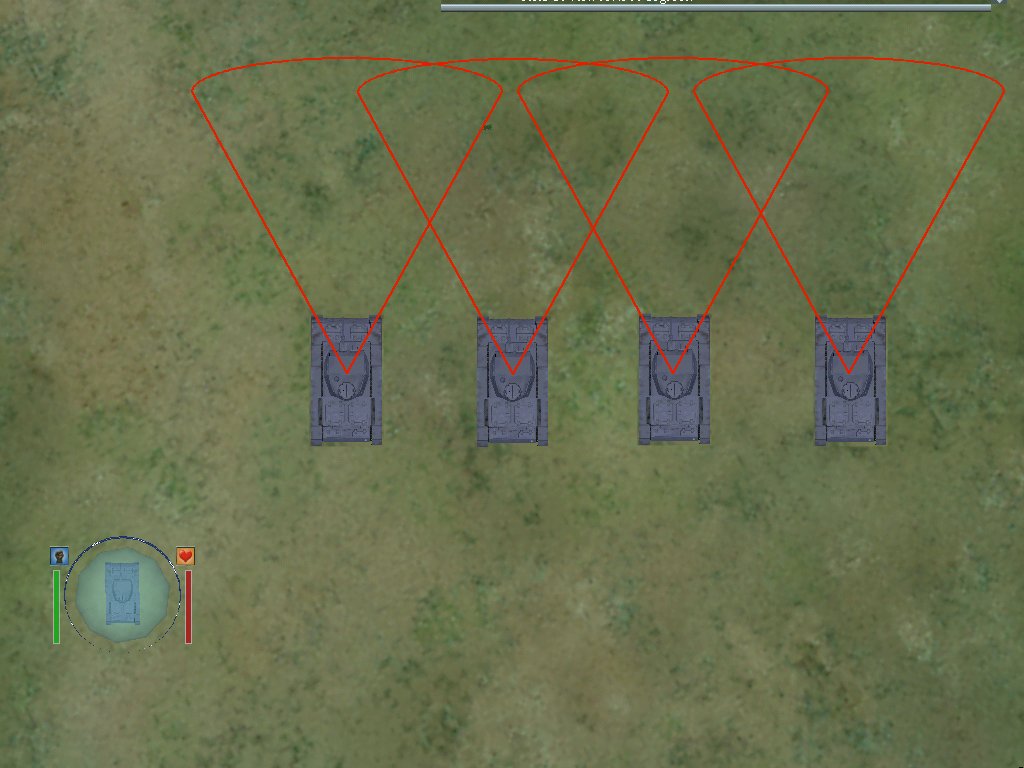 |
All of these formations can be used with as few as 2 tanks, to as many as practical (7-8).
Cover and Concealment
The Panzer is a bit more difficult to hide versus the green camouflaged A13. The dark color of the Panzer contrasts most of the environment in the game, making you stand out. The term 'Cover' means anything which you can hide behind which will actually stop incoming fire. You can take cover behind a building, in a valley or depression, behind some trees, etc etc. Concealment is anything which masks the outline of your tank and makes you less noticeable to the observer. Be clever in choosing cover and concealment, try to think in the mind of the Allied tanker who's trying to find or shoot at you. Try to visualize how you would look in the gun sights of the enemy's tank. Here is an example of cover and concealment:
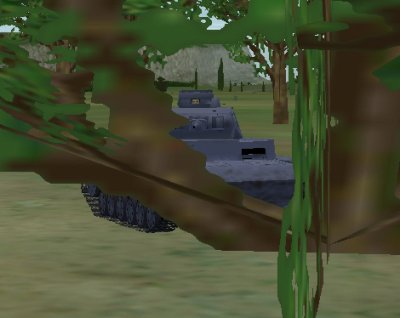 Here you see the Panzer is making use of a
medium sized tree. The branches conceal more the half of the tank's surface, and
they also will stop incoming fire from striking the tank. Notice the gunner still
has a respectable field of view for engaging targets as shown here:
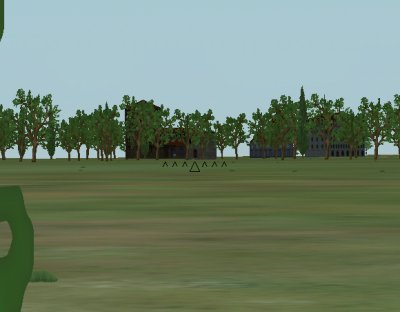
Here you see the Panzer is making use of a
medium sized tree. The branches conceal more the half of the tank's surface, and
they also will stop incoming fire from striking the tank. Notice the gunner still
has a respectable field of view for engaging targets as shown here:
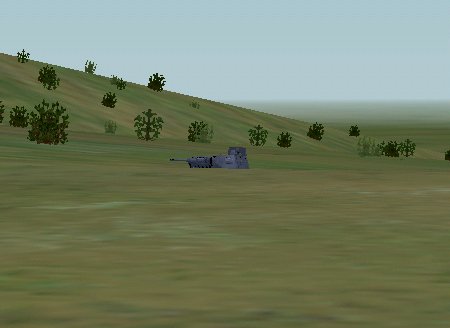
Here we see a Panzer taking advantage of the terrain to assume a 'Hull Down' posture. He is using the terrain to conceal the hull of his tank, leaving only the turret exposed to scan for and to engage enemies. Notice also how the terrain behind him helps mask the outline of the turret, the turret is not silhouetted against the bright skyline.
(To Be Continued........)
